The Episerver DXC offering has been available for about a year now. There has been quite a bit of documentation about it in Episerver World, but there are still quite a few knowledge gaps on how the offering works in reality. After implementing a few solutions using Episerver DXC and talking to its managed hosting team, we at Niteco thought we’d share what we’ve learned so far.
Episerver DXC is a managed service offering which provides a default setup to run an auto-scalable solution in the cloud. Behind the scenes, Episerver DXC is using Microsoft Azure with a number of services built into the package:
- Episerver CMS
- Episerver Commerce*
- Episerver Find
- New Relic surveillance
- Cloudflare CDN
- Sendgrid for email
*You can, of course, forego Episerver Commerce and opt for Episerver CMS only.
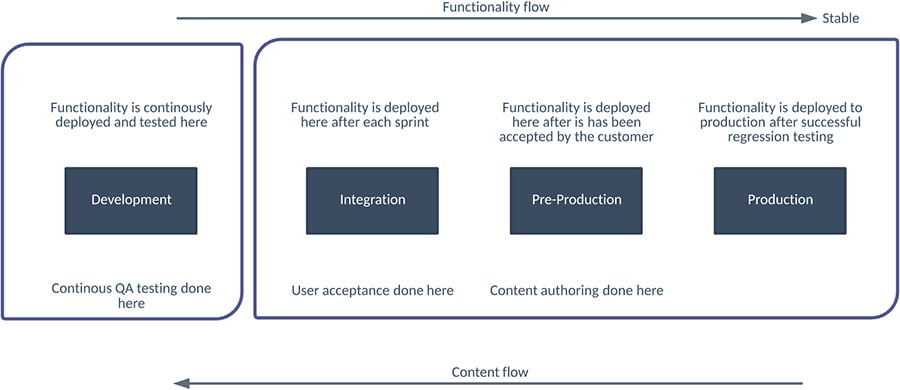
DXC also offers these three different environments:
- Episerver CMS
- Episerver Commerce*
- Episerver Find
- New Relic surveillance
- Cloudflare CDN
- Sendgrid for email
At Niteco, we have augmented the Episerver DXC setup with a local development environment, making the overall environments look like this:
Getting started
Once you have officially signed your Episerver DCX deal, Episerver will provide you with a Deployment Profile. You can import in Visual Studio, but you only have access to deploy in the integration environment. When you are ready to publish to this environment, you can use the Visual Studio publish the tool together with your profile (of course, you should also use an automated build tool to deploy once the solution is up and running). But, before the solution can be full automated, you must send an email to the Episerver Managed Service team with a bacpac* file containing your database and a zip file with your blobs so that they can set these up.
Editing in the solution
You will get a confirmation email when the Managed Service team has deployed the database and blobs. If everything goes as expected, you should be able to load the URL into the integration environment and see the web site up and running. At this point, you can start editing and publishing content to the integration environment. At Niteco, we have used the Pre-Production environment as the main editing environment while the site is in production until the site goes live. We move the latest content back to the Integration and Development environment at regular intervals in order to work with up-to-date content. After the site has gone live, editing is done in the production environment.
Note: If you want to secure the editorial environments, you can set up a white list of IP addresses. More information about this can be found here.
Episerver DXC and scaling
With Episerver DXC, you do not have to consider how many nodes the solution needs in order to perform well. Episerver automatically scales the number of frontend nodes by checking the CPU load and site load at certain intervals. After a scale up request is made, it takes a few minutes for the server to warm up. If you want to do a performance test of the solution, Episerver recommends you notify them before doing any loaded test so that they can set up the desired number of nodes before the test starts.
Publishing the solution
As mentioned above, you only have direct access to the staging environment in the Microsoft Azure user interface. You need to contact Episerver Managed Team for the following tasks:
• Publish the solution from Integration to Pre-Production.
• Publish the solution from Pre-Production to Production.
• Move latest content (database and blobs) from one environment to another.
• Download a database dump to be able to use in your local development environment.
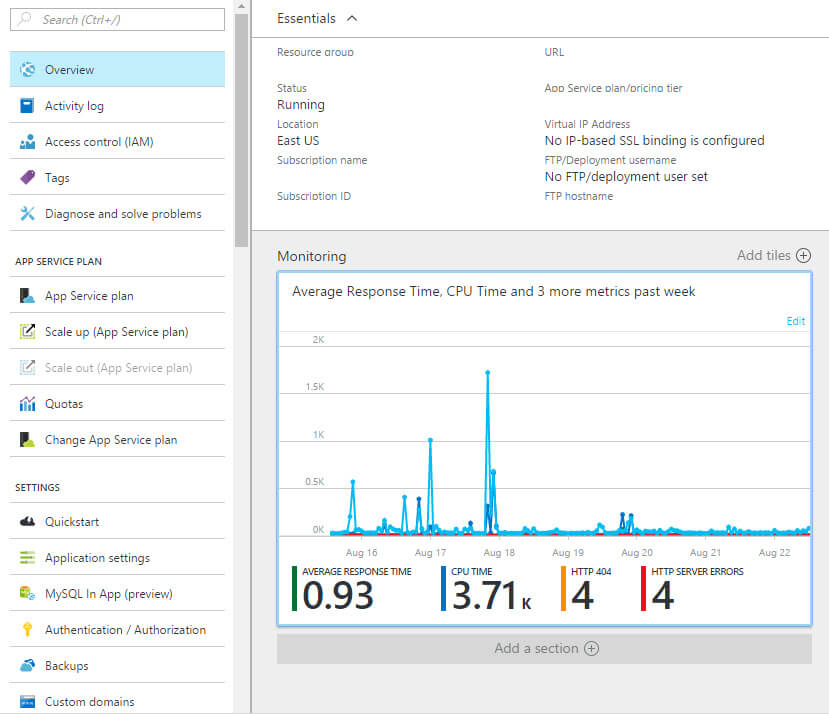
Accessing the integration environment in Azure Portal
The Managed Service Team can assign your Azure account to access the portal.azure.com where you can see more information about the Integration environment. Here you can see a number of things like the number of request errors, how many blobs files you have, average response time and much more.

Other good things to know
• If you want to publish the solution on a weekend, you need to schedule this in advance with the Episerver Managed Hosting Team.
• If you have any custom setting in Web.config, or custom AppSettings, you need to notify Episerver so they can note that when they migrate the config file. Episerver will overwrite the setting in Azure. As an example, Episerver Find is using two different search indexes for Production and Pre-production. This will be configured in Azure so that the config file can be the same in different environments.
• Deployments are done manually. We first create a ticket; then it takes few hours for Episerver to finish it. This is important to note because we have a delay when deploying.
• All environments are configured to use CloudFlare as the CDN provider. You can have a maximum of 100 domain names.
• Site monitoring is handled automatically using a monitoring tool. If the production site is down, a ticket is opened automatically with a target solution time of two hours.
• The editorial environment is not separated from the live nodes. Episerver recommends using access rights and potentially IP restrictions to give access to this environment.
• The publishing tool allows you to check which files are updated. For example, you can review whether only some minor configuration in web.config have been done by comparing the file versions.
• Every web app in Azure has its own GIT repository.
• There is a small one-time step to configure that Azure's site to accept GIT pushing. This is easy to do in Azure's portal UI.
We hope this has been helpful for you in taking a look under the hood of Episerver DXC. I want to give credit to my colleagues Hiep To and Ton Nguyen for sharing their insights. As we learn more, we’ll keep sharing what we uncover!
Further reading about Episerver DXC:
https://world.episerver.com/digital-experience-cloud-service/
to transform your business and drive results?


