I have participated in several projects over the past few years where the client asked us to come in and take over their Episerver Commerce sites from the current team, which may either be in-house or provided by another Episerver partner.
In my opinion, taking over Episerver Commerce sites can be quite messy given the complex nature of any commerce implementation as compared to CMS. In addition, short hand-over periods and a lack of up-to-date documentation can pose some challenges.
However, by following the simple TACKLE framework I outlined below, we have succeeded in a number of Episerver Commerce takeover projects, including taking over sites for big retailers. Therefore, I’ve decided to write this piece to share our practice.
The TACKLE framework outlined below emphasizes the actions that must be taken, in a certain order, to effectively manage the transition and establish trust with some quick wins before venturing into more substantial changes. The framework consists of six sequential steps that help you to focus on one thing at a time instead of trying to do everything at the same time.
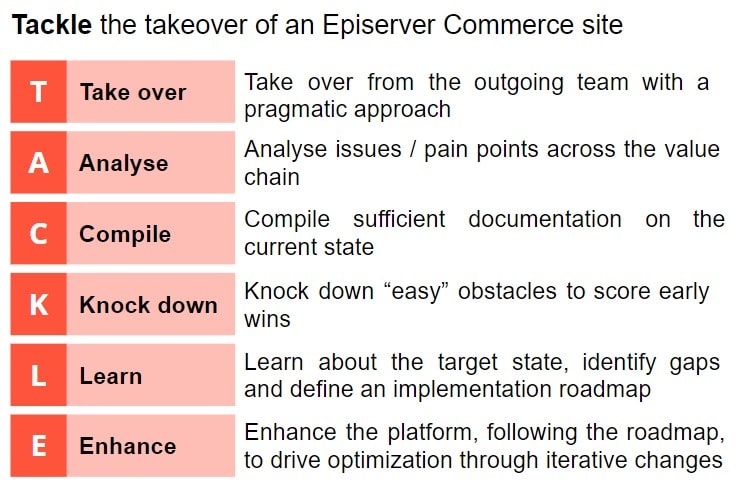
Take over from the outgoing team with a pragmatic approach
Any takeover project starts with the transition from the outgoing team. The transition window is typically quite limited in duration, with actual time to work together with the outgoing team usually being even shorter. Therefore, you need to make every second count. Don’t waste your time on trivial stuff and focus on getting the key information.
At first, you should request access to all environments, credentials, documentation and, of course, the source code repository. With the source code on hand, as a developer, you might be tempted to take a deep dive into a code review, but that should wait. Step back and try to understand the big picture first!
In order to garner a good understanding of the entire system, you should focus on key areas, from both technical and functional perspectives.
In terms of infrastructure, if it is a standard setup on DXC, your life will be much easier. Otherwise, you would need to find out how the environments are currently set up – whether they are on-premises or use self-managed cloud hosting, and whether CDN is in place. In a load balanced environment, you should pay attention to how cache invalidation works, as inconsistent content or pricing can cause a bit of drama.
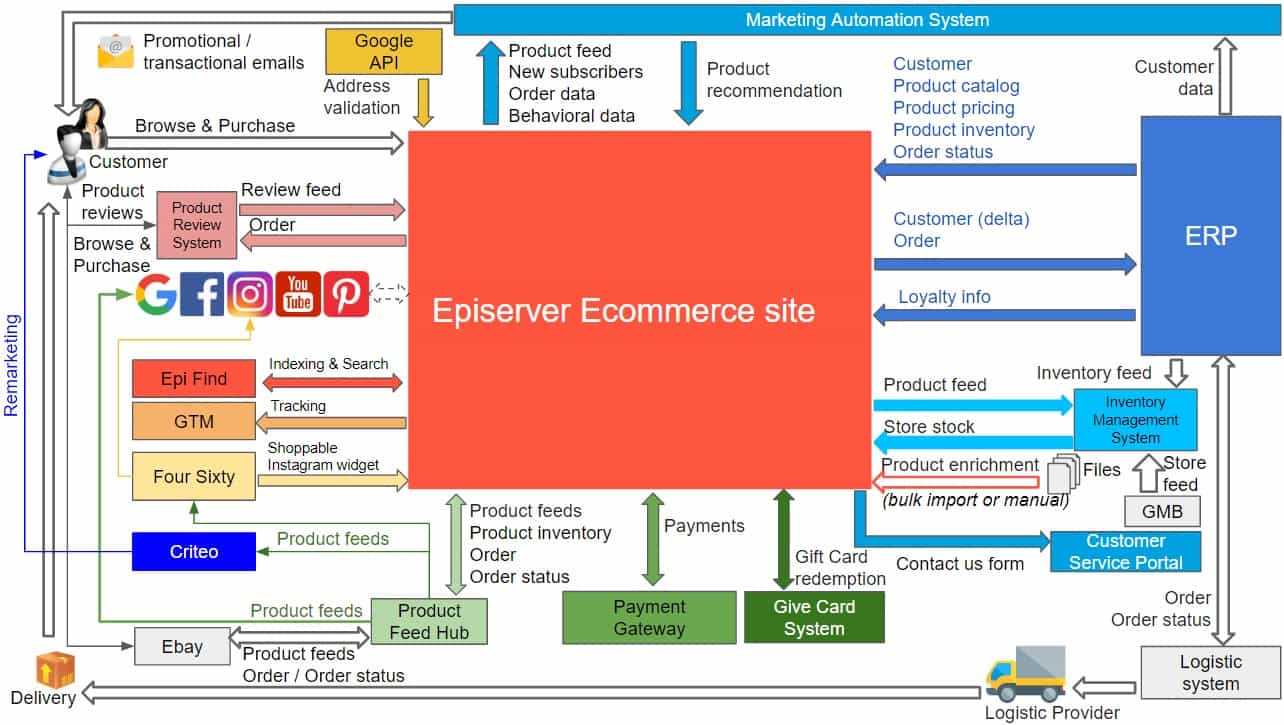
The underlying infrastructure is critical, but the most important and yet most complex topic would be integration – as outlined in my other blog post – as an e-commerce system always interconnects and depends on other systems to function. The illustration depicts a diagram I drew for one of our Episerver Commerce takeover projects. As you can see, I used different colors for different external systems and the corresponding arrows showing data flow. This kind of integration diagram is a great visual aid for the whole team to understand how data flows in and out of Episerver. In addition, you should try to work out the data elements and the mechanism for each integration touch point as well as whether the endpoints are configured in web.config or site settings. In addition, it is good to know which external systems have sandbox/test environments for testing purposes.
Aside from built-in scheduled jobs that come with Episerver Commerce, there are always custom scheduled jobs for different things such as to import price or inventory data or to generate certain reports. Hence, you should always look at scheduled jobs under the admin section in the CMS UI and work out which is which. It’s also important to learn the reason behind the scheduled time of each job as there might be some inter-dependency with external systems. For example, a file import job should be scheduled to run only after the file is transferred over.
Unlike bespoke solutions, where each user function must be studied carefully to understand system functionalities, an e-commerce site typically has a set of standard pages for users – namely homepage, store locator page, registration page, account details page, product listing page, product detail page, cart page, checkout page and order confirmation page. Therefore, by just spending 30 minutes on the site trying out the end-to-end flow from registration, view product, add to cart, check out and pay would give you a pretty good understanding of its functionalities. So don’t waste time conferring with the outgoing team about things you can find out about when browsing the site. However, there are some particular functions and logics worth checking:
-
The logic behind the display order of products in the product listing page
-
Rules related to showing prices: original price vs sale price, customer-specific price, …
-
Rules to show promotion banners/sales badges
-
Custom promotions
-
Shipping fee calculation
In addition to functions on the public site, there might be custom functions for back-office users in the Episerver CMS user interface, which is component-based and pluggable. These custom functions can come in various forms, namely add-ons or views or widgets. Knowing all the customizations for back-office use will help you understand how the Episerver CMS UI has been extended.
Once you have a good grasp of the individual functions on the public site and Episerver CMS, it’s time for you to learn about key workflows, namely: product catalog ingestion, product enrichment, price and inventory synchronization, check out and order submission and order status updates. It’s crucial to understand these flows inside-out as they are the most critical portions in any e-commerce implementation. In my experience, the majority of issues/enhancements would arise along these flows, so being able to quickly visualize the flows in your head would be a great help with the thinking process.
Once you have looked at the e-commerce system from a bird’s eye view and got a pretty good understanding of the system in its totality, you can now jump into code review to see how the system is implemented. I’m not going to go into details with regard to code review, as it would be a big topic on its own, but you should start with taking stock of all projects in the Episerver Commerce solution to understand the purpose of each one. Some of them might no longer be in use, such as the integration code for an obsolete payment gateway. From a back-end perspective, it’s needless to say that you should look at each Episerver Commerce subsystem – content repository, catalog, orders, customers and marketing. And in the front-end, you should know if plain javascript or jquery or a more modern javascript such as React/Angular/Vue.js is used.
By the end of the transition period, you should have been able to set up local development environments and run end-to-end testing with all payment methods. You must also conduct a pilot deployment with trivial changes such as adding a log statement and an invisible element in the UI. By doing this, you can get to know the conventions for source code branching, deployment steps and, most importantly, gain the confidence that you can deploy changes to the production environment.
Analyze issues/pain points across the value chain
During the transition phase, through extensive discussions with the outgoing team, you might have gotten a pretty good picture of the issues and pain points of the current implementation. However, the view might be skewed toward the technical aspects, so performing a value chain analysis – as outlined in my other blog post – might be beneficial.
You should conduct short interviews with various teams involved in the e-commerce operating model, namely product management, marketing, sales, order fulfilment and customer service as well as supporting functions in IT and accounting/finance. Each interview should start with a deep dive into how each team currently performs their duties, their perception of the e-commerce system in terms of issues, inefficient operations and inadequate functions for them to work optimally.
After talking to everyone, you will be able to paint a more complete picture of the current state, issues/gaps and the expected target state at the micro level.
Compile sufficient documentation on the current state
Inadequate and obsolete documentation is quite common with most e-commerce implementations, especially when the implementation is a few years old and things have changed, but documents have not been updated. Details of these changes can be buried deeply in Jira, so it’s not easy for the new team to navigate.
Therefore, taking over is a good time to supplement the document set with new content so that the new team can refer to the documents whenever required. Don’t try to recreate the entire documentation from scratch but take stock of what is available, what is missing, what is obsolete and compile new content accordingly. Taking good notes in all discussions – whether with the outgoing team or with users – will greatly assist with documentation.
Knock down “easy” obstacles to score early wins
Having done enough talking, analyzing and documentation, in addition to keeping the site up and running and providing sufficient support when the outgoing team has left, it’s time for the new team to make changes instead of just maintaining the status quo. This is rightfully expected by the client.
However, you should never try to take on big-ticket items too early as they are more complex and riskier to touch. Therefore, you might end up not being able to deliver the desired high-quality output within the allowed time frame, which would be a serious setback affecting your credibility. This would be exacerbated if there are already doubts from certain people on the client side about the ability or competency of the new team.
Therefore, you should carefully curate the first list of items to work on by going through high and medium-priority items and extract those that have clear technical solutions, are less time-consuming and easy to verify.
Being able to solve some issues early will greatly boost your confidence level and credibility, which will give you a breather before you tackle the more complex obstacles.
Learn about target state, identify gaps and define implementation roadmap
While continuing working through items, you should also organize a few workshops within the first couple of months. These should involve senior management as well as employees, with the aim being to learn about the target state that is needed to achieve the business objectives around revenue, profits, branding and customer experience.
Knowing the current state and target state, you will then be able to identify the gaps that need to filled in order to bring the client from where they are today to where they want to go. The gaps can be related to UI/UX, back-end workflow/logic or back-office functions.
These gaps will form the basis for future initiatives, sequenced in a logical order based on inter-dependency and urgency. Your estimations on cost and time for each initiative will help clients decide their direction while keeping the return on investment in mind.
Once the budget is secured, you can prepare a clear roadmap for implementation that will provide transparency for both the client and the implementation.
Enhance the platform as per the roadmap to drive optimization
After the road-mapping stage, it’s time to kick off each individual initiative with proper governance in place, as optimization initiatives will be carried out in parallel with business-as-usual (BAU) activities. Separating the BAU team and optimization team is probably a good idea – if the budget allows it – as it will minimize distractions and result in a greater speed of development.
Agile development is the way to go to deliver iterative changes through sprints, typically of two weeks each. By following this guideline, clients can see changes happening on the platform on a regular basis, keeping everyone more engaged. It also spreads out the workload, especially for user acceptance testing, as the client’s digital team is typically quite busy with BAU activities.
Niteco offers continuous maintenance and improvement of all aspects of your site. For more information click here.

